Why the Arc Reactor
I've allways loved Iron Man. I remember watching the movie when it came out in 2008, and the Arc Reactor has allways been so cool to me. It looks really futuristic, and I have to admit, I was a litle sad in Iron Man 3 when Tony Stark became sans-arc-reactor. But then Avengers: Infinity War came around, and Tony had an new arc reactor. And with an newfound iterest in Marvel movies and a love of engineering, I wanted to replicate the arc reactor as best as I could. Attahced to this walkthrough is the CAD drawings and other tools I used if you want to replicate the reactor yourself.Materials List
A lot of the stuff on here is a bit of overkill, but I wanted to try and build the arc reactor in the most technical way possible in the spirit of Tony Stark
1. 3M Super 77 Spray Adhesive
2. A grey/black athletic shirt with no logo. I ended up using a cotton shirt with a logo on it, and that was a really big mistake
3. A small LED circuit that isn't too heavy
4. Printer paper
5. One of those clear blue binder dividers
6. A Small scrap (~4"x~4") of MDF
7. Metallic Spray Paint (I used a can of silver Rustoleum)
8. A really nice X-Acto Knife that can cut precisely. This is the most important part of the whole thing and is what will make the whole thing look like a million bucks
9. A compact LED light source. I stared by using a set of Snap Circuits, but eventually upcycled a promotional keychain from an event.
10. Some sort of design software like SolidWorks, Inkscape, etc.
Designing the Arc Reactor
Depending on your chest/shirt size, the specific dimesnsions will vary a lot, so it's really important that you find the "sweet spot." What I would reccomend doing is cutting out triangles of varying sizes and sticking them on a shirt to get a feel for what you think is a good size. Once you've found a a good size, you can get started on making the frame.
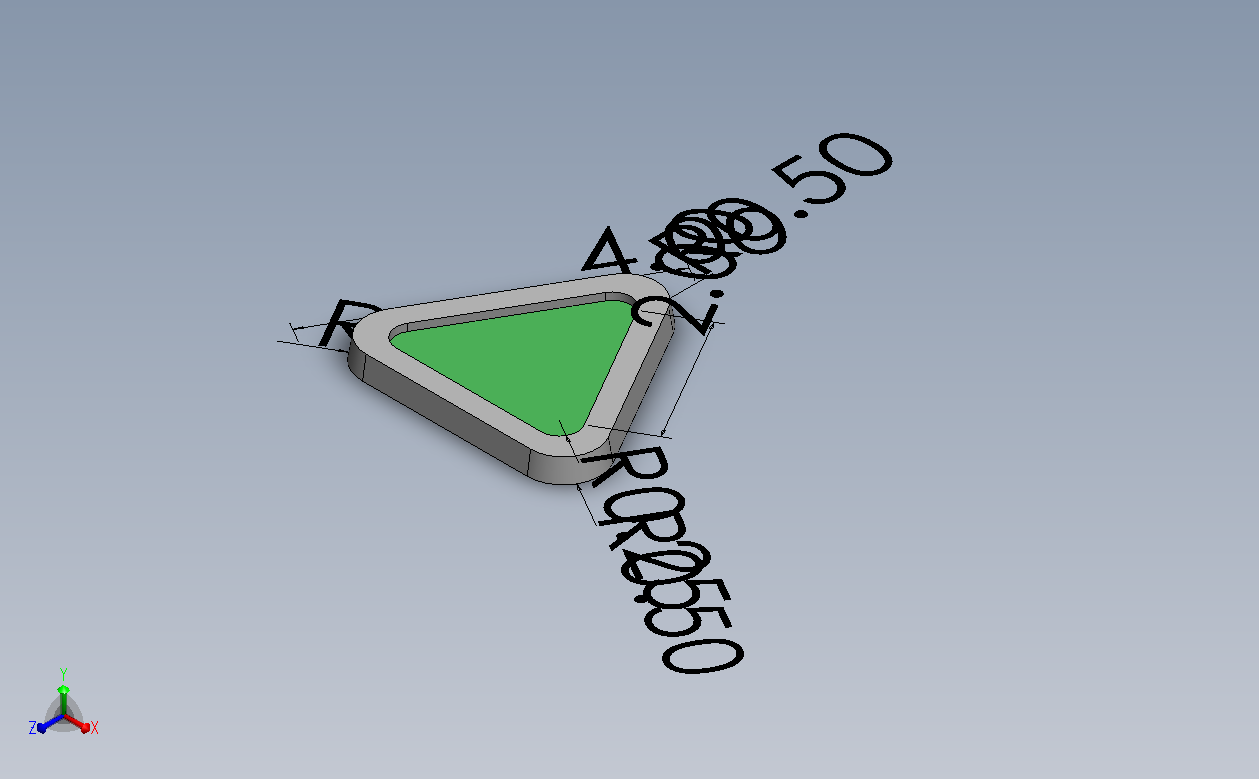
I designed my frame using SolidWorks, which I'll be honest, is like cutting an apple with the master sword, but I found it really helpful.
Once you have a good idea of your dimesnsions, go into SolidWorks, and create a triangle of the same dimesnsions. Then, perform a sketch fillet on the edges to create a rounded triangle. One that's done, create another triangle inside the outer triangle with a small-ish width between the two. For me, it was close to about 1/4 inches between the two. Once that's done, extrude the top section up by 1/8".
Fitting the outer casing
Once you have a solid casing designed in Solidworks, it's important to make sure the outer casing fits well. The way I did this in Solidworks was that I exported the CAD model of the shell into a SolidWorks drawing and then, I was free to overlay an image, to make sure the arc reactor fit perfectly. I found a 2d fanart of the reactor, and then vector traced the pattern of the arc reactor. I then imported that into the Drawing plan in Solidworks, and overlayed over a part schematic so that I perfectly align the outer casing with the shell.
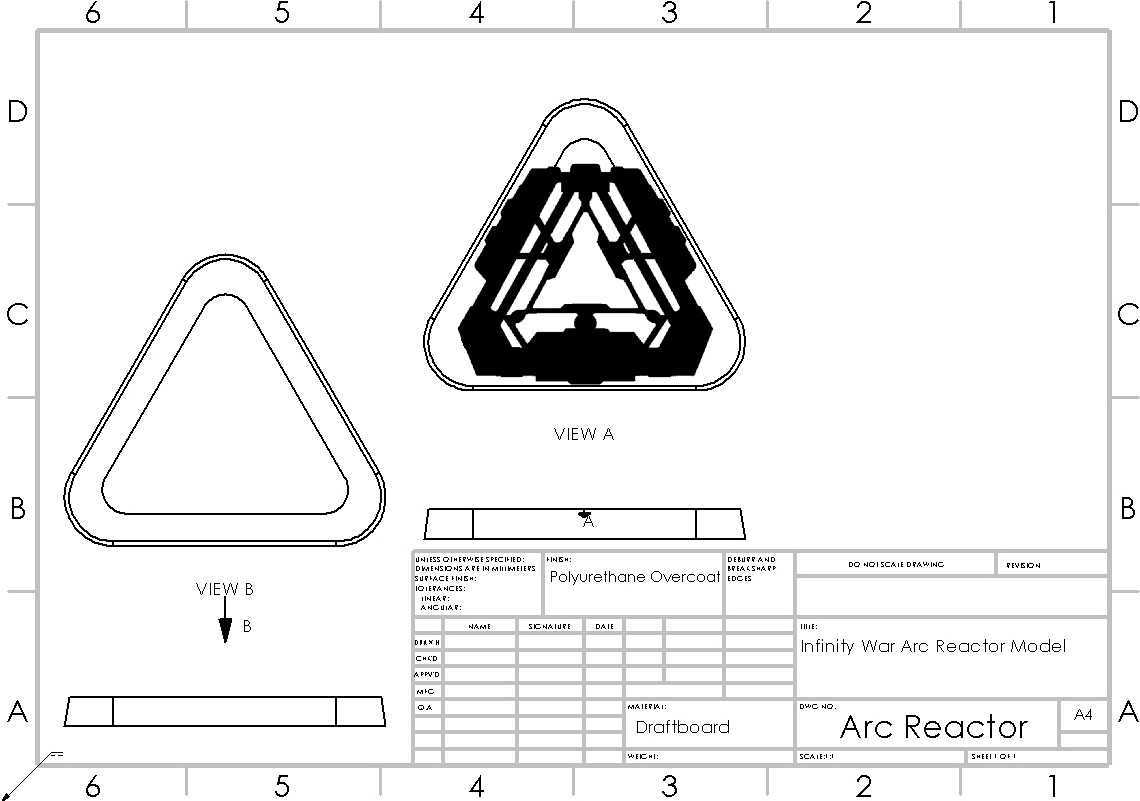
Cutting out the side frame
Now that you have the design, print out the sign and cut out the part of the sketch without the outer shell on it, and cut out the triangular frame on a thin piece of MDF using a jigsaw/scroll saw. Sand down the edges and any inconsistencies. Optionally, you can apply some spray-on polyurethane to the wood for longevity.

Cutting out the Outer Casing
After you're done with the sideframe, use an x-acto knife (or any old utility knife works) to carefully cut out the white areas of the arc reactor outline. Be especially careful to make sure that both sides remain symetrical, because it won't look as nice if it isn't symetrical.

Putting Together the Lights
The first time I used this, I deconstructed a Snap Circuits LED light, which meant the circuit looked like this:

Later on, though, I realized how clunky having the battery pack elsewhere was, so I instead moved to deconstruct one of those blinking LED keychains they give out at events. I took the circuit board out of its casing, and then coverd the back part in felt so that it could attach to the shirt without my bare chest touching the circuit board.
Putting it all together
Now that we have everything, you can cut open the shirt and first start by attaching the triangle frame to the shirt, and then use a contact cement to adhere the complete outer casing to the top of the frame. Once that's done, attach the circuit board with the LEDs to the top part of the shirt and position the LED's inside the triangle.

Done!
Now that the arc reactor was done, I had an awesome Halloween costume! I also got the chance to show off my arc reactor at a Marvel-themed Model UN comittie where we dealt with shapeshifting Skrulls!

Bonus Cool Thing!
The first time I paper cut an Arc reactor design, I messed up the symetry, so I used black spray paint to spray onto a piece of paper with the reject as the template to make some cool art!

Alternative Way with a Laser Cutter
When I went off to the FIRST world championship, I needed a good costume for the world-famous Roboprom. Wanting to make a big splash with a fancily done Arc Reactor, I used a laser cutter to make the design and remounted the new and improved outer shell. I had the amazing privellege of using a Glowforge, which made the edges and small details look crisp, and after a round of spary painting, the Arc Reactor looked even closer to the real thing! Plus, I mean they didn't even make a physical version of the arc reactor in Infinity War, so the fact that I made the CGI a reality is pretty darn impressive!